Tip: The picture may actually look better when viewed from a distance, so lean back in your chair instead of getting close to the screen.
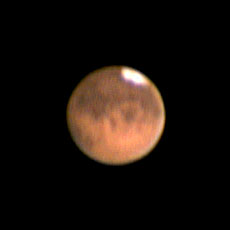
On this page I present one of the Mars images I've acquired during this very favourable apparition. When you compare my picture with the masterpieces found elsewhere on the web, please keep in mind that due to my northern location the planet was only 19 degrees above the horizon. Objects that low in the sky are heavily affected by atmospheric turbulence as well as atmospheric dispersion which leads to undesired colour fringing.
I therefore also describe an attempt at manually removing some of the false colour seen at the top and bottom of the unprocessed image. I believe that dedicated software is available to perform this task, but since I am a natural born tinkerer I just had to do it my way!
Some quick notes:
| Location | Lomma, Sweden, 13d East, 56d North |
| Optics | C8 at f/26 with Celestron Ultima barlow lens |
| Mount | Vixen Super Polaris GEM tracking at sidereal rate |
| Imaging device | Philips ToUcam Pro with Baader UV-IR cut filter |
| Imaging method | 900 frames captured, best 90 (approximately) frames selected |
| Stacking software | Registax |
| Post processing | Photoshop |
Please scroll down to read more about how this picture was created. If you're not that interested in technical details but do have a general interest in astronomy and astrophotos, you may want to have a look at my main page instead.
I captured about 900 frames of which only 10% were any good, so I ended up with 90 or so images to stack. I tried stacking twice as many, that is the best 180 frames, but since seeing was so poor due to the low altitude of the planet, the inferior quality of those extra frames only made the final picture more fuzzy. The main drawback of stacking as few as 90 frames is a certain amount of grain in the sharpened image, but I'll have to live with it. The leading planetary imagers often stack hundreds or even thousands of frames for a very smooth end result.
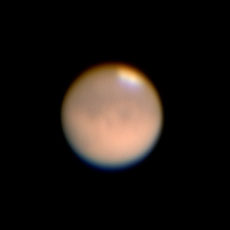
Note the red colour fringing at the top and blue colour fringing at the bottom. This is due to atmospheric dispersion, which means that different wavelengths (colours) of light are refracted (bent) by different amounts. This is the same phenomenon that occurs when white light passes through a prism and a full spectrum can be observed.
To remove much of the colour fringing I colour separated the RGB image in Photoshop and found that the R-component needed to be shifted 2 pixels downwards and the B-component 3 pixels upwards with respect to the G-component, which I used as a sort of master and left alone.
As I write this I have a lot of things on my mind and I simply don't have the time to expand the text into a full-blown, step-by-step tutorial, but I hope that this outline may be of some interest. Besides, I believe there is software available that will do the job almost automatically and my reason for writing this down is mainly to document the steps for my own records.
I've created an animation to clarify the process.
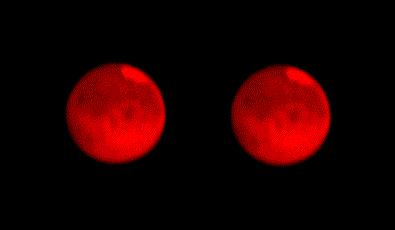
The animation shows four pictures in sequence: R, G, B and RGB. To the left is the original version, not corrected for atmospheric dispersion, and to the right is the version where the colour componentes have been vertically shifted. Note that the pictures to the left jump a little (look carefully because the effect is subtle) whereas those to the right remain much more fixed with respect to each other. The closeup below clearly shows improvement in the recombined RGB image.

It should be noted that there is an entirely different way of reducing atmosphere-induced colour fringing which involves a wegde-shaped piece of glass placed between the main optics and the imaging device. The dispersion in the prism cancels the dispersion in the atmosphere. The method was described in the August 2003 issue of Sky & Telescope magazine.
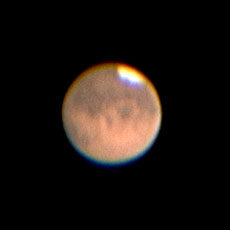
Finally, I used Photoshop to adjust contrast, and maybe some other parameters that I've already forgotten about, to give the image a pleasing appearance. This is subjective and I wonder if the version below, which is the same as the top image, really is nicer than the one called "Wavelet filtered in Registax". It is so easy to make a picture look hard and artificial by excessive image processing.
For a comparison image of much higher quality, have a look at a picture taken by Young-Real Kim in Korea. Although it was obtained some ten days earlier, the view is similar and many surface features can be identified in both pictures.
Comments and suggestions are welcome. Send e-mail to bengt@df.lth.se
Images and text copyright © 2003 Bengt Ask.