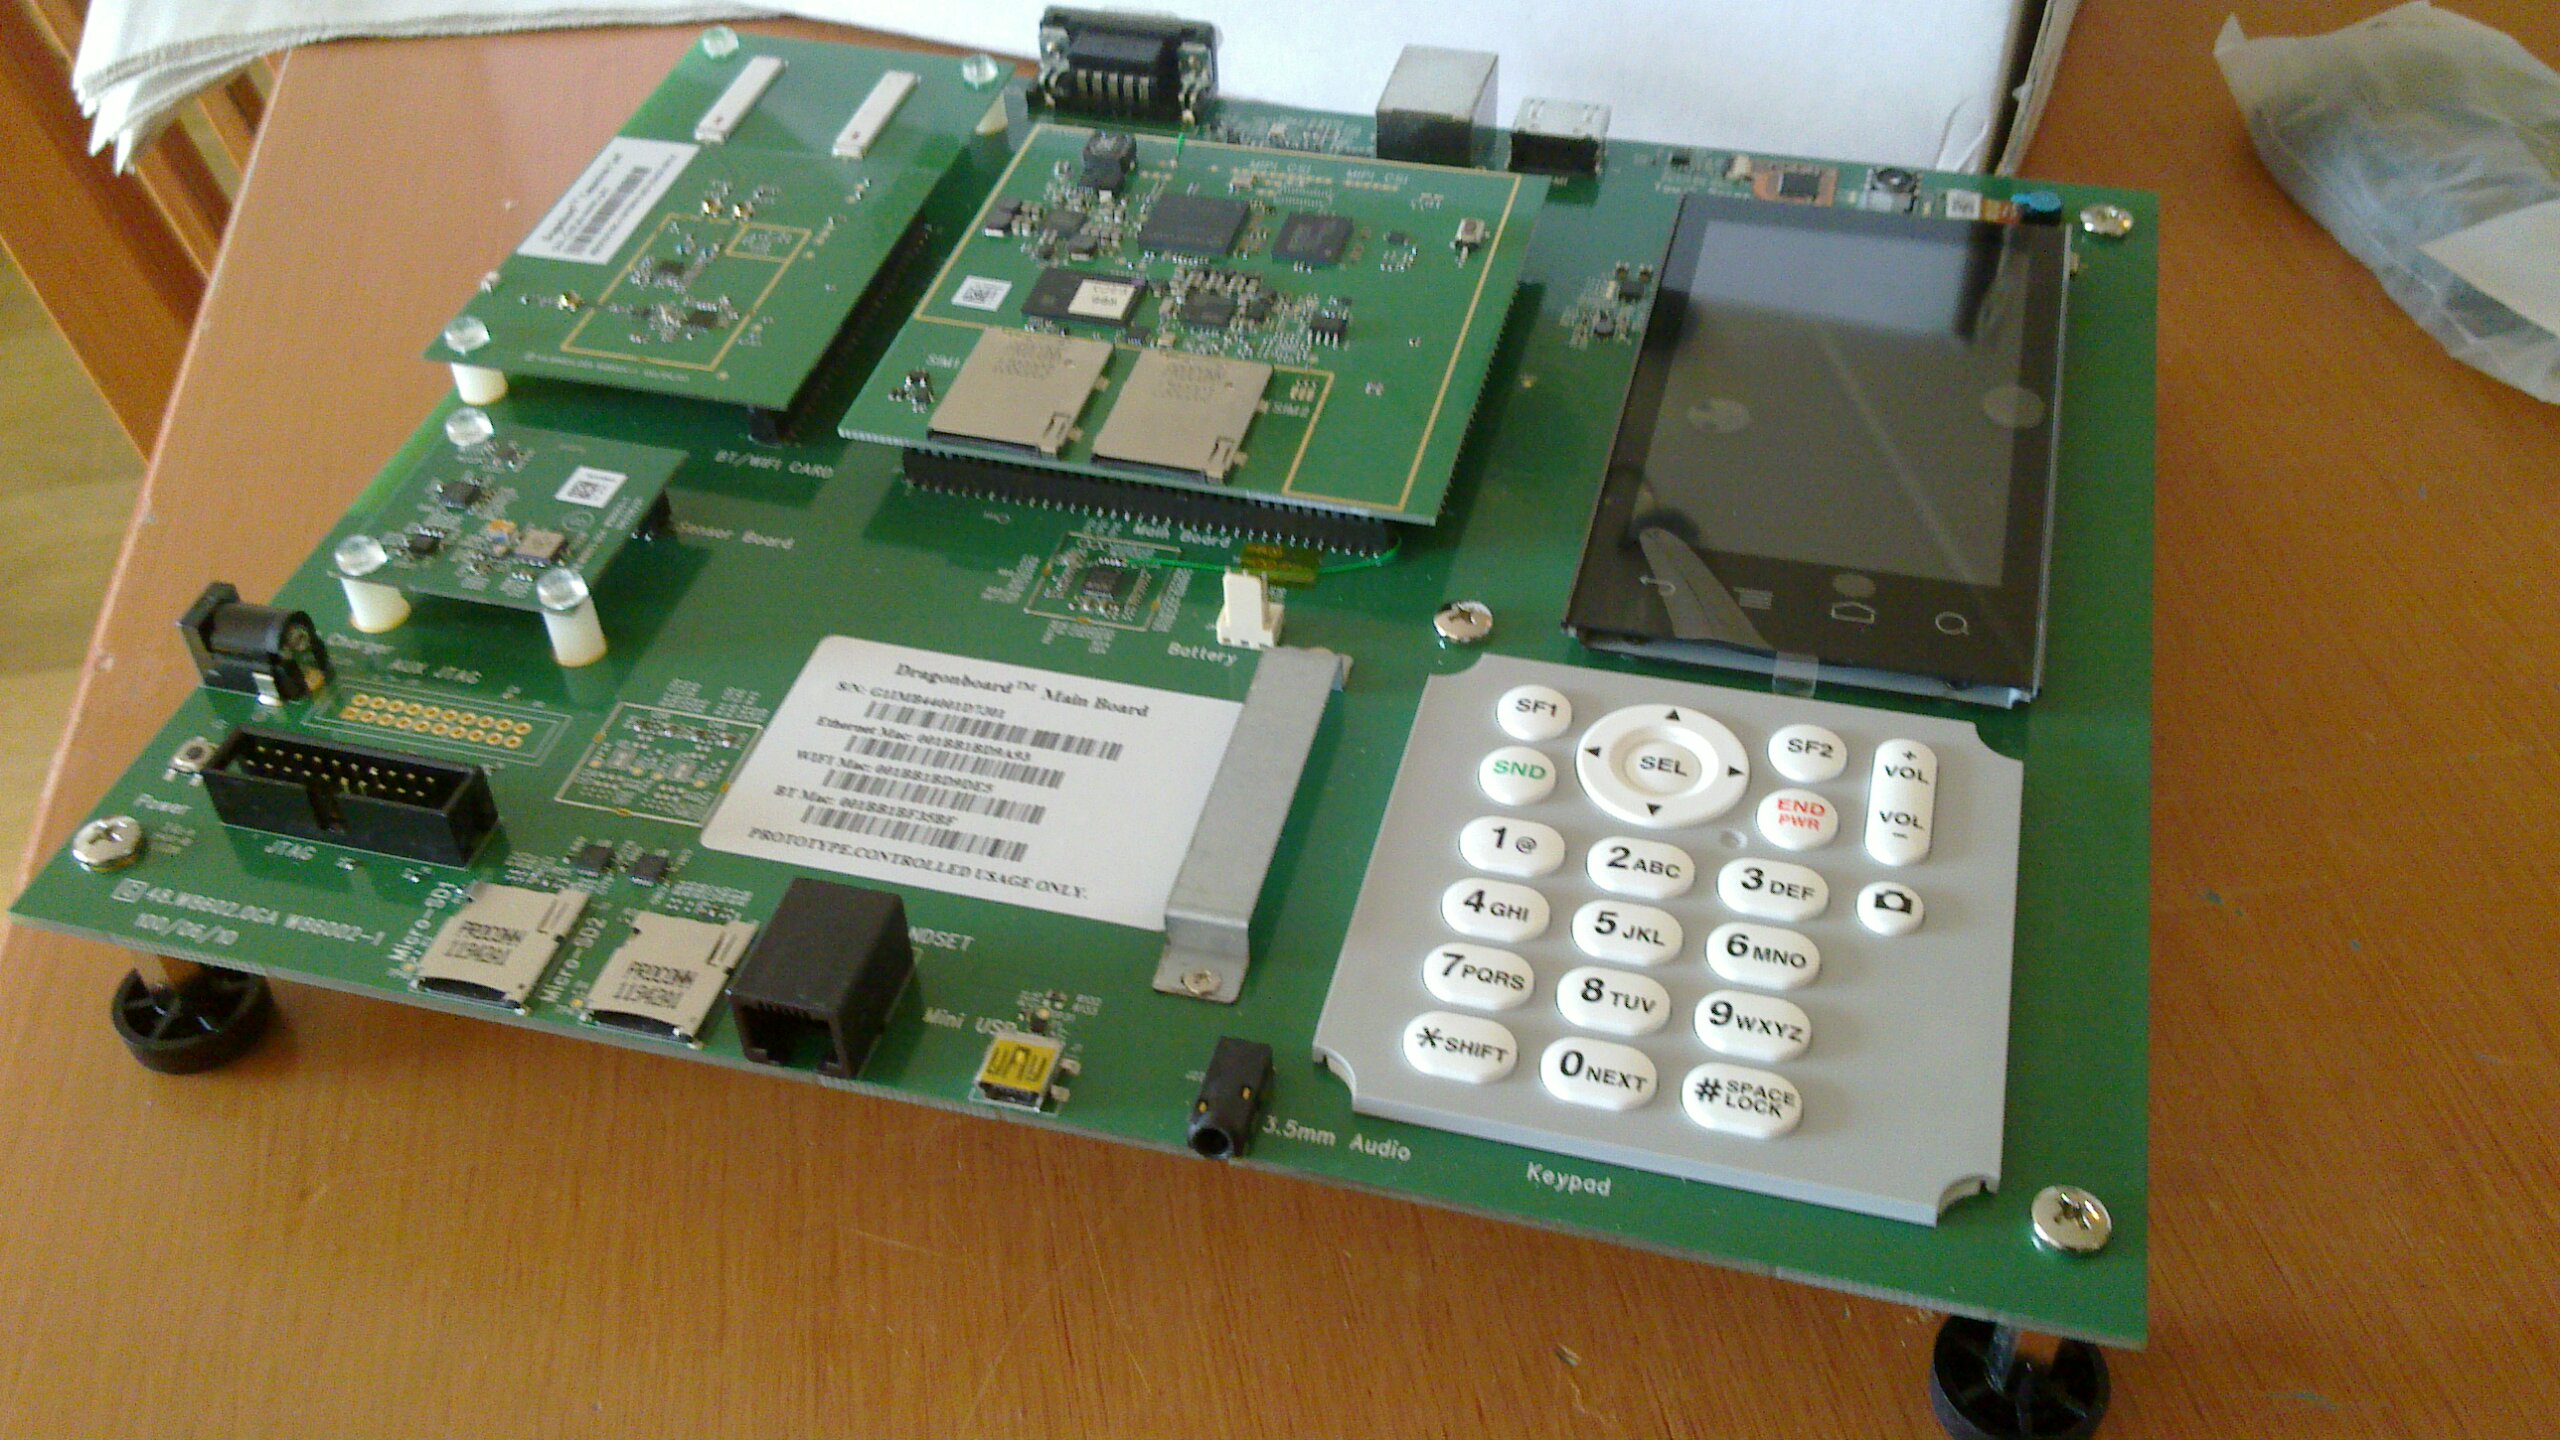
Booting a recent kernel on the APQ8060 Qualcomm DragonBoard

The original APQ8060 DragonBoard, also the first DragonBoard
ever.
Most recent test was done with kernel v6.0-rc3 on 2022-09-09.
MMC/SD, GPIO, LEDs, ethernet and all sensors are working.
Background
I got this board from some Qualcomm guys at the Embedded Systems Conference
"Design West" in San Jose in april 2012. The board was pushed as the first Qualcomm
attempt for a developer board for their platforms around september 2011,
as they contracted to BSQUARE to provide support and education for this board.
(See this blog post
from Qualcomm's Brian Spencer, or this video
from Charbax, there is also an roadmap document
showing a few DragonBoards.) Here is some idiomatic terminology you need:
- The SoC used is an APQ8060,
it means this is a MSM8x60 variant without modem, because the DragonBoard
doesn't do 3G data or voicecalls, no. So it's a so-called "application processor"
only.
- The RS232 serial port is set at 115200 baud. USB-to-serial dongles
didn't work for me, you might need a real serial port. Just open
the console and play around. If you need to be root on the default software
just hit su and play around. It's this quite restricted Android
shell.
Preparations
This board only talks the fastboot boot protocol. (No U-Boot or such.)
So you need to get this tool. On Fedora, simply:
dnf -y install android-tools
This will get you the command-line tool fastboot.
To get the board into fastboot mode so that a new kernel (or image,
or whatever) can be uploaded to it, remove the battery connector and DC plug
so that the board is completely unpowered, then press and hold down the 5
key on the keypad while inserting the DC plug. At this point the board
is in the state where you can run the fastboot command line.
Since this manouver is tricky I have simply mounted a common light switch
on the power cable to my DragonBoard. This works like a charm: flick
it off, hold down 5 flick it on. We're in fastboot mode.
Boot a mainline Linux kernel
With some hands-on a mainline Linux kernel can actually boot to prompt
on the Dragonboard since v3.14-rc1. Some bugs were introduced with the
switch to mach-qcom in kernel v3.15 but should be fixed in kernel v3.17.
In recent kernels things JustWork(TM).
To compile a fresh APQ8060 DragonBoard kernel you first need a cross compiler
such as the
ARM GCC toolchain.
Then you can use
my makefile and
my rootfs CPIO image - put this in your
$HOME directory (in case
you're interested that was generated using
this script) in the main
Linux source tree like this:
linux$ make -f apq8060.mak config && make -f apq8060.mak build
Here are pre-compiled images that you can use and
test if you like:
So to boot a mainline kernel all you need is to replace the boot.img-zImage with something
freshly compiled. However the TTY name is also changed in mainline from
ttyHSL to ttyMSM so the parameter needs changing.
Actually, with a mainline zImage kernel all you need is:
fastboot --base 40200000 --cmdline "console=ttyMSM0,115200,n8" boot zImage
(Elder versions of fastboot substitute -b for
--base and -c for --cmdline.)
After this your board should boot to prompt on the serial port.
Documentation
Here is the
device tree for the APQ8060 board
in the upstream Linux kernel. You can see all hardware that has been
properly documented and has corresponding Linux drivers. It includes
the
MSM8660
SoC device tree
which defines all the low-level SoC devices.
Kernel TODO list
The kernel efforts are based on the vendor tree, currently a v3.4 kernel. It is
very unclear if Qualcomm will ever attempt to forward-port this kernel tree to
newer kernels than v3.4, especially for APQ8060/MSM8660. You can clone
the vendor tree like this:
  git clone git://codeaurora.org/quic/la/kernel/msm linux-msm
  cd linux-msm
  git checkout -b android-msm-3.4 refs/heads/q3.4/android-msm-3.4
While that is happening or not happening, I am sometimes working with the
upstream support for this chipset according to the TODO list:
- Main and CPU boards:
Create a proper DTS file (merged for v4.8)Enable pin controller in defconfig (patch merged for v4.8)Fix bug in RPM driver for APQ8060/MSM8660 (patch1 and patch2 sent, merged)Set up all regulators for the board (patch merged for v4.8)Set up the keypad from PM8058 (patch merged for v4.8)Add a LED driver for the PM8058 LEDs (patch v2 merged for v4.9)Add the LEDs for the PM8058 to the DT (patch merged for v4.9)Get the RPM driver to retrieve and enable message RAM clock (patch merged for v4.9)Enable the AT24C128 EPROM to be detected and read (only DTS entry and Kconfig needed, patch merged for v4.13)- Make the SDC5 slot work, no clue what is wrong here, it is hinted from the schematic
that the lines were, at one point, also or instead used by "UBM2" which means Univeral
Broadcast Modem MBP2600 for the now discontinued MediaFLO protocol. My guess is that the
MSM8660 SURF board had this chip using SDIO, but the APQ8060 Dragonboard repurposed
the lines for a second SD card reader, and something went wrong.
- Enable BAM DMA on the MMC/SD blocks, no clue why this will not work.
A guess is that some fabric clock needs to be enabled. Documents hint about
this DMA fabric being part of a sensor peripheral subsystem (SPSS) with its
own ARM7 CPU core and everything. It is illustrated as connected to the
"System Fabric" and "SPS Fabric".
Enable the EBI2 and SMSC Ethernet on top of it (all patches merged for v4.10)
Augment the TLMM pin controller to handle the EBI2 lines (patch merged for v4.8)Augment the GCC clock controller to handle the EBI2 clocks (2 of them, patch merged for v4.8)Define DT bindings for the EBI2 (patch, v6, merged for v4.9)Create an EBI2 driver in drivers/bus/ (patch, v5, merged for v4.9)Augment DT bindings for SMSC911x to account for RESET and PME lines (patch, v3, merged for v4.9)Add RESET GPIO handling to SMSC911x (patch, v3, merged for v4.9)Create Dragonboard DT entries for all the above (patch merged for v4.10)- Bonus: add PME interrupt handling to SMSC911 - requires working system suspend to be tested
- Enable SMEM driver and SoC info
- Enable slave USB HS on the Mini USB connector
- Enable LPASS Low power audio I2S and PCM audio on the Woolfson Micro codec WM8903
NOT POSSIBLE: THE DRAGONBOARD APQ8060 RELEASE NOTES REV 1.0 OCTOBER 2011 STATES THAT AUDIO IS BROKEN
Update the RPM clock bindings for MSM8660/APQ8060 (patch, patch, merged for v4.15)Implement the MSM8660/APQ8060 RPM clocks as this includes PLL4 that is used by LCC (patch, merged for v4.15)- Update the LCC clock bindings for the MSM8660/APQ8060 LCC (patch)
- Implement the LCC Low-power audio clock controller (patch)
Add regulator support to the WM8903 codec driver (patch)- Add runtime PM handling to the WM8903 codec driver
Refactor clock name handling in LPASS (patch upstream)- Create an LPASS I2S and PCM driver for the MSM8660/APQ8060 SoCs
- Create an ALSA SoC "sound card" driver for the combined QCOM APQ8060+WM8903 driver
Add DTS entries to the MSM8660 for the GSBI8 "Core I2C" where the WM8903 is connected (patch merged for v4.13)Add DTS entries to the APQ8060 DragonBoard for WM8903 (patch merged for v4.13)
- Enable battery charging, charger is SMB137B @GSBI8 I2C address 0x08
Sensor board:
Enable IIO driver for AK8975 magnetometer (patch merged for v4.8)
Fix up regulator handling (patch merged for v4.8)Add Vid regulator (patch merged for v4.8)Refactor regulator handling (patch merged for v4.8)Delay after enabling regulators (patch merged for v4.8)Power down at .remove() (patch merged for v4.8)Runtime PM support (patch merged for v4.8)
Enable IIO driver for BMP085 pressure sensor (patch exists for v4.8)
Add VDDD and VDDA to the DT bindings (patch merged for v4.8)Support device tree initialization (patch merged for v4.8)Add RESET GPIO line handling (patch merged for v4.8)Add support for getting supply regulators (patch merged for v4.8)Split driver in logical parts (patch merged for v4.8)Split off an I2C Kconfig entry (patch merged for v4.8)Add an SPI interface driver (patch merged for v4.8)Add support for the optional BMP085 EOC interrupt (patch merged for v4.8)>Add power management (patch merged for v4.8)Read calibration data once (patch merged for v4.8)Fix my own bug introduced in the runtime PM hooks (damned, patch, merged for v4.8)DELETE the old misc driver for BMP085 (patch, merged for v4.9)- Add triggered buffer handling
Create IIO driver for MPU-3050 gyroscope sensor (new driver in IIO needed)
Create DT bindings for MPU-3050 (patch, v4, depend on I2C gate patches, merged for v4.10)Create a fresh IIO driver for MPU-3050 (patch, v4, merged for v4.10)Add MPU-3050 to the DragonBoard device tree (patch merged for v4.11)Migrate all references and defconfigs to reference the new driver (patches merged for v4.10)DELETE the old input/misc driver for MPU-3050 (patch merged for v4.11)
Enable IIO driver for KXSD9 accelerometer sensor
Create DT bindings for KXSD9 (patch, merged for v4.8)Fix raw return bug (patch, merged for v4.8)Fix scaling bug (patch, merged for v4.9)Split out transport mechanism (patch, merged for v4.9)Split out a common .remove() function (patch, merged for v4.9)Split out SPI transport (patch, merged for v4.9)Do away with the write2 helper (patch, merged for v4.9)Convert to use regmap for transport (patch, merged for v4.9)Add I2C transport (patch, merged for v4.9)Drop the buffer lock (patch, merged for v4.9)Fix up offset and scaling (patch, merged for v4.9)Add triggered buffer handling (patch, merged for v4.9)Deploy proper register bit defines (patch, merged for v4.9)Fetch and handle regulators (patch, merged for v4.9)Replace "parent" with "dev" (patch, merged for v4.9)Deploy system and runtime PM (patch, merged for v4.9)Support reading a mounting matrix (patch, merged for v4.9)Create DragonBoard device tree entries for the KXSD9 (patch merged for v4.11)
Create and enable an IIO driver for CM3605 proximity and ALS sensor
Clean up the PM8xxx namespace (patch merged for v4.10)Create DT bindings for the PM8xxx XOADC (patch exists, merged for v4.12)Break out common code from the SPMI ADC driver (patch merged for v4.12)Create a driver for the PM8xxx XOADC (patch exists, merged for v4.12)Create DT bindings for the CM3605 (patch exists, merged for v4.11)Create an IIO driver for the CM3605 (patch exists, merged for v4.11)Create device tree entries for the XOADC on the MSM8660 family (patch v6, merged for v4.13)Create DragonBoard device tree entries for the XOADC and CM3605 (patch v6, merged for v4.13)
- Connectivity Card:
- XO clocks needs to be implemented for MSM8660/APQ8060 as this is used extensively by the connectivity peripherals (see Srinivas patch for the 8064 counterpart as inspiration, this patch will be merged in v4.17)
- Enable WCN2243 Bluetooth 3.0
- Enable WCN2243 FM Radio (I2C on GSBI7, address 0x0c, or maybe 7 bit 0x06?)
vendor driver in drivers/media/radio/radio-tavarua.c, include/media/tavarua.h
- Enable WCN2243 EFuse chip (I2C on GSBI7, address 0x0c, or maybe 7 bit 0x06?)
- Enable WCN1314 Wireless LAN chip
- Display (experimental branch):
- Create a driver for the MSM8660/APQ8060 MMCC (multimedia clock controller) on par with
the others in drivers/clk/qcom/mmcc-*
- Enable MSM DRM driver, 8x60 has MDP4
- Enable Freedreno GPU driver, 8x60 has the A220 Adreno
- Enable display output, display AUO WVGA LCD Module 400x800 H361VL01 V4 TFT3.61"
Panel driver in drivers/video/msm/lcdc_auo_wvga.c
Board setup code in arch/arm/mach-msm/board-msm8x60.c
Enable CSG cypress TMA340 touchscreen (I2C on GSBI3 address 0x24, patch applied)- Enable HDMI output
- Camera:
- Enable ST Microelectronics VX6953CBQ05I/1 5MP front camera (I2C on GSBI4, address programmable)
- Enable Omnivision OV9726 back camera (I2C on GSBI4, address 0x10)
EEPROM contents
The board has an Atmel AT24c128 16KiB EEPROM which according to the manual is used
for "device ID". When you extract the contents over I2C with a simple
dd if=/sys/bus/nvmem/devices/0-00520/nvmem of=/eeprom.bin
and look at it in a hex
editor it looks like this:
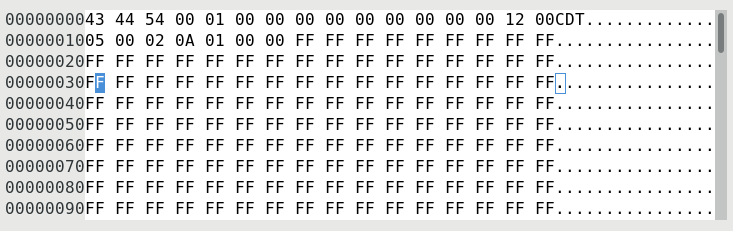
The rest of the data is just 0xff ad nauseam.
According to the Internetz "CDT" means Configuration Data Table and
the information here means:
- 0x00-0x03 "CDT\0": Magic header
- 0x04-0x05 0001 CDT version 0x0001
- 0x06-0x0d 00 x 4 x 2 Reserved
- 0x0e- CDB0
- 0x0e-0x0f 0012 offset to first byte in CDB0
- 0x10-0x11 0005 size of CDB0
- 0x12-0x16 CDB0 - 5 bytes of platform ID
- 0x12 0x02 version 2
- 0x13 0x0a APQ8060 DragonBoard (I guess?)
- 0x14 0x01 HW major version 1
- 0x15 0x00 HW minor version 0
- 0x16 0x00 Subtype 0
Split the supplied boot image and boot the parts
There are various tools for peeling apart the supplied boot.img into
its constituents. The one that finally worked for me was named unpackbootimg,
and produced a number of files, most notably the kernel zImage and
the ramdisk. When you have these parts the following magic boots it:
fastboot -b 40200000 -c "console=ttyHSL0,115200,n8 androidboot.hardware=qcom" -p 2048 boot boot.img-zImage boot.img-ramdisk.gz
Building all of Android or just the stock kernel
This is pretty painful.
- Install repo from Google
- Retrieve and sync the source code something like so, and wait for some hours until it's sync:ed out:
mkdir android
cd android
repo init -u git://codeaurora.org/platform/manifest.git -b ics_chocolate -m default.xml --repo-url=git://codeaurora.org/tools/repo.git
repo sync
- yum install perl-Switch zip curl gcc gcc-c++ flex bison gperf glibc-devel zlib-devel ncurses-devel libX11-devel libstdc++ libsx-devel readline-devel libXrender libXrandr
- Install Make 3.81 locally somewhere, e.g.:
mkdir /var/android-build
cd /var/android-build
tar xvfz make-3.81.tar.gz
cd make-3.81
./configure
./build.sh
- Install Sun's (Oracle's) JDK
- export PATH=/usr/java/jdk1.6.0_32/bin:/var/android-build/make-3.81:$PATH
- export LD_LIBRARY_PATH=/usr/java/jdk1.6.0_32/lib
- source build/envsetup.sh
- choosecombo, choose release, msm8660_surf, eng using the figures
- make -j9 kernel (if you have 8 cores, like me, rule is # of cores +1)
- If you are lucky the whole shebang will build in due time and the build products stack up in out/target/product/msm8660_surf
- Note: I only got this to the point of building that kernel and boot.img
Links